


Engineered Hardwood Flooring frequently asked questions
Q - What is Engineered Hardwood flooring
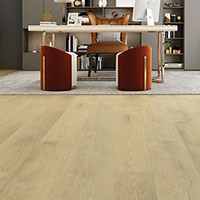
Engineered hardwood flooring is a type of wood flooring designed to provide the look and feel of solid hardwood while offering enhanced stability and resistance to moisture. It’s made by layering a thin veneer of real hardwood on top of multiple layers of plywood or high-density fiberboard (HDF), giving it a sturdy, multi-layered structure.
Key Components of Engineered Hardwood Flooring
Top Layer (Veneer): The surface layer is a thin slice of real hardwood, typically 1-4 mm thick, showcasing the natural beauty of the wood species (like oak, maple, or walnut). This layer gives the flooring an authentic hardwood look.
Core Layers: Below the veneer, multiple layers of plywood or HDF are stacked in a crisscross pattern. This cross-layered construction gives engineered hardwood its dimensional stability, making it more resistant to expansion and contraction caused by changes in temperature and humidity.
Bottom Layer (Stabilizing Layer): A backing layer is sometimes added to provide extra stability and balance to the plank.
Advantages of Engineered Hardwood Flooring
- Moisture Resistance: The layered construction makes engineered hardwood more stable in humid conditions, so it’s less likely to warp or swell compared to solid wood. This makes it a suitable choice for areas like kitchens and basements.
- Versatility: Engineered hardwood can be installed on various subfloors, including concrete, plywood, and radiant heating systems, making it more versatile than solid hardwood.
- Wide Range of Styles: Because the top layer is real wood, engineered hardwood is available in a wide variety of wood species, stains, and finishes, offering many design options.
- Eco-Friendliness: Engineered wood uses less hardwood overall, making it a more sustainable option compared to solid wood flooring.
Installation Methods
Engineered hardwood can be installed in several ways:
- Floating: Planks are connected using a click-lock system without adhering to the subfloor, creating a “floating floor.”
- Glue-Down: Planks are glued directly to the subfloor, suitable for concrete and high-traffic areas.
- Nail-Down or Staple-Down: Planks are nailed or stapled to a wood subfloor, providing a solid, traditional installation.
Maintenance and Lifespan
Engineered hardwood flooring requires routine maintenance similar to solid wood, including sweeping and damp mopping. Depending on the thickness of the veneer, some engineered floors can be sanded and refinished once or twice, though they generally don’t allow for as many refinishings as solid hardwood.
Common Uses
Engineered hardwood flooring is ideal for:
- Living rooms and bedrooms for its warm, authentic look.
- Kitchens and basements (with controlled moisture levels) due to its moisture resistance.
- Open-plan spaces where a seamless, hardwood appearance is desired.
In essence, engineered hardwood flooring offers the look of real wood with added stability and versatility, making it a popular choice for various residential and commercial applications.
Q - DIY Product - Is Engineered hardwood flooring easy to install
Engineered hardwood flooring is generally considered easier to install than solid hardwood, making it a popular choice for DIY projects. Its layered construction gives it stability, reducing the likelihood of warping and making installation more manageable for DIYers. However, the ease of installation can vary based on the method you choose. Here’s an overview of common installation methods and their suitability for DIY:
Installation Methods for Engineered Hardwood Flooring
Floating/Click-Lock Installation
- Ease: Easiest option for DIYers.
- Process: The planks “click” together without needing glue or nails, forming a “floating floor” that doesn’t attach to the subfloor.
- Subfloor: Can be installed over various subfloors, including concrete, plywood, and existing flooring.
- Benefits: Requires minimal tools and is quick to install. Ideal for those who want to save time and avoid complex installation steps.
Glue-Down Installation
- Ease: Moderate difficulty for DIY.
- Process: Involves spreading adhesive on the subfloor and placing the engineered hardwood planks directly onto the glue.
- Subfloor: Best for concrete or plywood subfloors.
- Benefits: Provides a solid, stable floor, and offers good sound insulation. However, working with adhesives can be messy, and aligning planks can be challenging without prior experience.
Nail-Down or Staple-Down Installation
- Ease: More challenging for DIY, generally suited for experienced DIYers.
- Process: Involves nailing or stapling the planks into a wood subfloor.
- Subfloor: Only suitable for wood or plywood subfloors.
- Benefits: Provides a very secure installation. However, it requires specialized tools (like a flooring nailer or stapler) and can be labor-intensive, so it may be better suited to professional installation.
Additional Tips for DIY Installation
- Subfloor Preparation: Ensure the subfloor is clean, level, and dry. This can prevent issues down the road.
- Acclimation: Allow engineered hardwood to acclimate to the room for 48-72 hours before installation to help avoid expansion or contraction after installation.
- Underlay: For floating installations, use an underlay to provide sound absorption and moisture resistance.
Overall
For most DIYers, floating installations are the easiest and most time-efficient, with minimal tools required. If you’re confident working with adhesives, glue-down can be another DIY option, but it may require a bit more patience and skill.
Q - Is underlay required with Engineered Hardwood
Reasons for Using Underlay with Engineered Hardwood
- Sound Reduction: Underlay can help absorb sound, reducing noise in high-traffic areas or multi-level homes. This is particularly beneficial in apartments, condos, or homes with hardwood on upper floors.
- Moisture Barrier: If you’re installing engineered hardwood over concrete or in a basement, a moisture barrier underlay can prevent moisture from seeping up from the subfloor, protecting the wood from warping.
- Comfort and Insulation: Underlay adds a slight cushion, making the floor more comfortable underfoot. It also provides some thermal insulation, which is helpful in colder areas.
- Leveling Minor Imperfections: Underlay can help smooth out small irregularities in the subfloor, creating a more even surface for installation.
When Underlay May Not Be Needed
- Plywood Subfloors: In some cases, when installing engineered hardwood on a plywood subfloor and when nailed or stapled down, underlay may not be necessary. The flooring will already be stable, and additional underlay may not add much benefit.
- Built-in Underlayment: Some engineered hardwood products come with a pre-attached underlay, eliminating the need for an additional layer.
- Glue-down installations, underlay is typically not needed. When engineered hardwood is glued directly to the subfloor, the adhesive itself provides stability and helps with sound absorption, making an additional underlay layer unnecessary. The glue acts as both a bonding and cushioning agent, especially for installations over concrete. However, some installers may still use a thin moisture barrier layer if extra protection is desired.
Q - Is Engineered Hardwood Flooring Water Proof, areas that it can be installed
Engineered hardwood flooring is more resistant to moisture than solid hardwood due to its layered construction, but it is not fully waterproof. It can handle some exposure to moisture and humidity better than solid hardwood, but prolonged exposure to water can still cause damage, such as warping, swelling, or delamination. Here’s a breakdown of areas where engineered hardwood can be installed and where caution should be exercised:
Areas Suitable for Engineered Hardwood
- Living Rooms and Bedrooms: Engineered hardwood is an excellent choice here because these rooms usually don’t experience much moisture or temperature fluctuation.
- Dining Rooms and Hallways: It works well in high-traffic areas due to its durability and stability.
- Kitchens: Many people choose engineered hardwood for kitchens because it can handle occasional spills and is more resistant to moisture than solid hardwood. However, spills should be wiped up promptly to prevent damage.
Areas Where Engineered Hardwood Should Be Used with Caution
- Bathrooms: Full bathrooms with showers and tubs are generally not ideal for engineered hardwood, as high moisture levels and humidity can lead to warping over time. However, in powder rooms or half-bathrooms without showers, engineered hardwood can be suitable.
- Laundry Rooms: Similar to bathrooms, these areas often experience humidity and the potential for leaks. Engineered hardwood isn’t recommended here unless steps are taken to minimize moisture exposure.
Q - What is a floating floor and why expansions are needed
A floating floor is a type of flooring installation where the planks or tiles are not glued, nailed, or stapled to the subfloor. Instead, the planks connect to each other with a locking mechanism, allowing the floor to “float” above the subfloor. This installation method is popular for engineered hardwood, laminate, and some vinyl plank floors, as it allows for flexibility, ease of installation, and adaptability to various subfloors, including concrete, plywood, and even existing flooring.
Why Expansion Gaps Are Needed
Expansion gaps are crucial with floating floors because wood and similar materials expand and contract naturally due to changes in temperature and humidity. Without these gaps, the flooring would have no room to move, leading to various issues, including:
- Buckling or Warping: When the flooring expands, it needs space to prevent pressure from building up. Without a gap, the planks may buckle or lift off the subfloor, ruining the floor’s appearance and integrity.
- Gapping: In lower humidity conditions, the floor contracts. If there’s no expansion gap, this can lead to visible gaps between the planks.
- Structural Integrity: Expansion gaps allow the flooring to flex as needed, reducing strain on the locking mechanism and prolonging the floor’s life.
Recommended Expansion Gap Size
To prevent these issues, it’s essential to leave an expansion gap around the perimeter of the room and any fixed objects. The general recommendation is to leave a gap of 6 to 12 millimeters (approximately 1/4 to 1/2 inch). However, it’s crucial to consult the specific manufacturer’s guidelines for your flooring product, as recommended gap sizes can vary. For instance, some manufacturers may suggest a minimum gap of 10 millimeters.
After installation, baseboards or trim are typically used to cover these gaps, maintaining the floor’s aesthetic while allowing necessary movement.
Key Points
- Always refer to the flooring manufacturer’s installation instructions for precise expansion gap requirements.
- Ensure the subfloor is clean, dry, and level before installation to facilitate proper expansion and contraction.
- Maintain consistent indoor humidity levels to minimize excessive expansion or contraction of the flooring.
By adhering to these guidelines and manufacturer specifications, you can ensure the longevity and performance of your floating floor installation.
Q - How is engineered hardwood different from solid hardwood
1. Construction
- Solid Hardwood: Made from a single piece of solid wood, typically 19 mm (¾ inch) thick, though it can sometimes be 8 mm (5/16 inch) thick in thinner profiles.
- Engineered Hardwood: Composed of a thin layer of real hardwood (typically 2-6 mm) on top of a multi-layered core of plywood or high-density fiberboard (HDF), with the total thickness usually ranging from 7-20 mm.
2. Stability and Moisture Resistance
- Solid Hardwood: Prone to expansion and contraction with humidity and temperature changes, which can cause issues like warping and gaps. It performs best in stable, low-moisture environments.
- Engineered Hardwood: Due to its layered construction, it’s less likely to expand or contract, making it suitable for more humid areas, such as basements and kitchens.
3. Installation Options
- Solid Hardwood: Generally installed using a nail-down or staple-down method, which requires a wooden subfloor. It is not recommended for installation over concrete or radiant heating systems.
- Engineered Hardwood: Offers versatile installation methods, including floating (click-lock), glue-down, and nail-down. This makes it compatible with various subfloors, including concrete, plywood, and even radiant heating systems.
4. Thickness and Refinishing Potential
- Solid Hardwood: Typically 19 mm thick, allowing for multiple sanding and refinishing, usually up to 5-7 times over its lifespan.
- Engineered Hardwood: The refinishability depends on the thickness of the top hardwood layer:
- 2-3 mm top layer: Can be refinished once or twice.
- 4-6 mm top layer: Can often be refinished up to three times.
- Less than 2 mm: Usually cannot be refinished, as sanding could expose the core layers.
5. Durability and Wear Resistance
- Solid Hardwood: Highly durable but more susceptible to scratches and dents, especially in high-traffic areas. Moisture can cause damage if it’s not properly controlled.
- Engineered Hardwood: Has a durable, layered core and typically comes pre-finished with protective coatings, offering resistance to scratches and dents. It’s more resistant to humidity and temperature changes than solid wood.
6. Environmental Impact
- Solid Hardwood: Uses more hardwood per plank, requiring more resources. However, sustainably sourced solid wood can still be eco-friendly and long-lasting.
- Engineered Hardwood: More eco-friendly than solid wood because it uses less hardwood overall, with the bulk of the plank made from sustainable plywood or HDF layers. Many products are also certified by sustainable forestry programs.
7. Cost
- Solid Hardwood: Generally more expensive due to the amount of hardwood used.
- Engineered Hardwood: More affordable, especially with thinner veneer layers, while offering a similar aesthetic and feel.
8. Where Each Can Be Installed
- Solid Hardwood: Best for above-grade, climate-controlled areas like living rooms, dining rooms, and bedrooms. It’s not recommended for basements, bathrooms, or high-humidity areas.
- Engineered Hardwood: Can be installed in more areas, including basements, kitchens, and rooms with radiant heating, as well as over concrete subfloors. However, it’s still not ideal for full bathrooms or high-moisture areas.
Summary of Differences in Millimeters
| Feature | Solid Hardwood | Engineered Hardwood |
|---|---|---|
| Construction | Single solid piece, 19 mm | Hardwood veneer (usually 2-6 mm) over core |
| Stability | Prone to expansion/contraction | More stable and moisture-resistant |
| Installation | Nail/staple-down, wood subfloors | Floating, glue-down, nail-down options |
| Refinishing Potential | Multiple times | Depends on veneer: 2-3 mm (1-2 refinishings), 4-6 mm (up to 3) |
| Durability | Sensitive to moisture, can scratch | Resistant to humidity, durable finish |
| Eco-Friendliness | Uses more hardwood | Uses less hardwood, sustainable core materials |
| Cost | Generally more expensive | More affordable, varies by quality |
| Best Install Locations | Above-grade, low-humidity areas | Suitable for basements, kitchens, radiant heat |
In summary, solid hardwood provides a thick, single-piece wood construction that allows for multiple refinishings, while engineered hardwood’s layered structure offers better stability and versatility for various installations. Engineered wood’s range of thickness options, especially with different veneer thicknesses, makes it a practical choice for many environments.
Q - Can engineered hardwood be refinished
Yes, engineered hardwood flooring can be refinished, but the ability to do so depends on the thickness of the top hardwood veneer layer. Refinishing involves sanding down the surface layer to remove scratches, stains, or wear, and then applying a new finish. Here’s a closer look at when and how engineered hardwood can be refinished:
1. Top Veneer Thickness and Refinishing
- 2 mm or Thicker: Engineered hardwood with a top layer of at least 2 mm can typically be refinished once. Sanding removes about 0.5 mm of wood, so a 2 mm veneer layer can withstand light sanding.
- 3-4 mm Veneer: Floors with a veneer thickness of 3-4 mm can often be refinished 1-2 times, depending on wear and the depth of the sanding.
- 5-6 mm Veneer: Higher-quality engineered hardwood with a 5-6 mm veneer allows for more refinishing (up to 3 times), similar to solid hardwood.
- Less Than 2 mm Veneer: If the top layer is less than 2 mm, refinishing is usually not recommended. Sanding would risk exposing the underlying core, which could compromise the look and durability of the floor.
2. Factors Affecting Refinishing Potential
- Condition of the Floor: Refinishing is typically done to remove scratches, dullness, or light surface damage. If the engineered wood has deeper damage, such as deep gouges or stains, it may require multiple sanding passes or may not be suitable for refinishing.
- Factory Finish: Some engineered wood comes with a durable factory-applied finish (like aluminum oxide) that is harder to sand down. In such cases, professional sanding equipment may be needed to remove the finish before applying a new one.
3. Professional vs. DIY Refinishing
- Professional Refinishing: For engineered hardwood with a thick veneer, it’s often best to hire a professional. They have specialized equipment to carefully sand the thin veneer without damaging the core layers.
- DIY Refinishing: For minor touch-ups, a DIY approach using a light buffing machine or floor polish may help restore some shine without fully sanding the floor.
4. Alternatives to Full Refinishing
- Screening and Recoating: This process involves lightly buffing the floor (screening) and applying a new coat of finish. Screening doesn’t remove as much wood as full sanding, making it suitable for engineered wood with a thinner veneer.
- Polishing or Touch-Up Kits: For light surface scratches or dullness, hardwood floor polish or touch-up kits can help refresh the appearance without sanding.
Summary
Engineered hardwood can be refinished if it has a top veneer of at least 2 mm. Higher-quality engineered floors with thicker veneers (3-6 mm) offer more refinishing potential, while thinner veneers generally cannot be sanded. For minor wear, screening or touch-ups can often extend the life of the finish without a full refinish
Q - What is the difference between Engineered Hardwood and Vinyl Flooring
Engineered hardwood and vinyl flooring are both popular choices for homeowners, but they differ significantly in terms of materials, appearance, durability, and application. Here’s a comparison of the two:
1. Material Composition
- Engineered Hardwood: Made with a top layer of real hardwood veneer attached to a core of plywood or high-density fiberboard (HDF). The wood veneer provides the authentic look of hardwood, while the layered core gives it added stability.
- Vinyl Flooring: Constructed from synthetic materials, typically PVC. Vinyl planks often have multiple layers, including a design layer that mimics the look of wood, stone, or other materials and a protective wear layer for durability.
2. Appearance and Texture
- Engineered Hardwood: Looks and feels like solid hardwood because of the real wood veneer on the surface. Each plank has unique wood grains and textures that create a natural, warm look.
- Vinyl Flooring: Modern vinyl planks can realistically mimic the look of wood or stone but are made from synthetic materials, so they lack the natural grain and texture of wood. Some high-quality vinyl has embossed textures to resemble wood grain, but it doesn’t have the same authentic feel as engineered hardwood.
3. Durability and Moisture Resistance
- Engineered Hardwood: More moisture-resistant than solid hardwood, but it’s still susceptible to damage in high-moisture environments. Engineered wood can handle occasional spills in kitchens but isn’t recommended for bathrooms or laundry rooms.
- Vinyl Flooring: Highly resistant to moisture, making it suitable for wet areas like bathrooms, kitchens, basements, and laundry rooms. Some vinyl flooring is even waterproof, ideal for spaces where spills or water exposure are frequent.
4. Installation
- Engineered Hardwood: Can be installed in various ways, including floating, glue-down, or nail-down. Installation may be easier than solid hardwood but can require more skill if glued or nailed.
- Vinyl Flooring: Installed as a floating floor with a click-lock system, making it very DIY-friendly OR vinyl flooring may be glued down, but floating installations are common and simple.
5. Maintenance
- Engineered Hardwood: Requires gentle cleaning with hardwood-friendly products and should be protected from excessive moisture. It may need periodic refinishing if the veneer layer is thick enough.
- Vinyl Flooring: Low-maintenance and easy to clean with regular sweeping and mopping. It doesn’t require refinishing and is generally more resistant to stains, scratches, and wear.
6. Comfort and Feel Underfoot
- Engineered Hardwood: Feels warm and comfortable underfoot due to the natural wood veneer. It can also improve room acoustics.
- Vinyl Flooring: Often feels slightly cooler and harder underfoot compared to engineered wood, although thicker vinyl planks with underlayment can offer added comfort.
7. Cost
- Engineered Hardwood: Typically more expensive than vinyl, as it uses real wood. Costs vary depending on wood species, veneer thickness, and brand.
- Vinyl Flooring: Generally more affordable than engineered hardwood, with costs varying by quality, thickness, and design.
8. Environmental Impact
- Engineered Hardwood: More eco-friendly than vinyl as it contains real wood and is often produced sustainably. However, the adhesives used can sometimes contain VOCs.
- Vinyl Flooring: Made from synthetic materials, typically PVC, which isn’t biodegradable. However, some manufacturers produce low-VOC, recyclable vinyl products.
Summary
- Choose Engineered Hardwood if you want an authentic wood look and feel, are installing it in low-moisture areas, and are willing to invest in a more natural product.
- Choose Vinyl Flooring if you need a highly durable, waterproof option for high-moisture areas, want a budget-friendly, low-maintenance floor, and are okay with a synthetic look and feel.
Both options offer advantages, and the choice depends on the desired look, durability, and installation environment.
Q - What is the difference between Engineered Hardwood and Laminated Flooring
Engineered hardwood and laminate flooring are both popular alternatives to solid hardwood, but they differ significantly in composition, appearance, durability, and price. Here’s a detailed comparison of the two:
1. Material Composition
- Engineered Hardwood: Made with a top layer of real hardwood veneer (1-4 mm thick) over multiple layers of plywood or high-density fiberboard (HDF). This top layer gives engineered hardwood the authentic look and feel of solid wood.
- Laminate Flooring: Constructed from a high-density fiberboard core with a printed photographic layer on top, covered by a clear wear layer. The photographic layer can mimic various materials, such as wood, stone, or tile, but it’s not real wood.
2. Appearance and Texture
- Engineered Hardwood: Because the top layer is real wood, it has natural grain patterns and textures that make it look and feel like solid hardwood.
- Laminate Flooring: The design layer is a high-quality photograph, so while it can look quite realistic, it lacks the authentic grain and texture of wood. Some laminate flooring has an embossed texture to mimic wood grain, but it doesn’t have the same depth and natural variation.
3. Durability and Scratch Resistance
- Engineered Hardwood: More durable than solid hardwood due to its layered construction but still prone to scratching and denting like natural wood. Some types come with a protective finish that improves resistance to everyday wear.
- Laminate Flooring: Generally more scratch-resistant than engineered hardwood due to its tough wear layer. It’s a good choice for high-traffic areas or homes with pets and children, as it resists scratches and dents better than real wood.
4. Moisture Resistance
- Engineered Hardwood: More moisture-resistant than solid hardwood, thanks to its layered construction, but it’s still not fully waterproof. It’s suitable for rooms with some moisture exposure (like kitchens) but is not recommended for areas with high humidity or standing water (like bathrooms).
- Laminate Flooring: While laminate isn’t fully waterproof, some types are designed to be water-resistant, making it a better choice for areas with higher moisture levels. However, prolonged exposure to water can cause swelling and damage, so it’s not ideal for bathrooms unless specifically rated for it.
5. Installation
- Engineered Hardwood: Can be installed using various methods, including floating (click-lock), glue-down, or nail-down. This versatility allows it to be installed on different subfloors, including concrete, wood, or radiant heating systems.
- Laminate Flooring: Almost always installed as a floating floor with a click-lock system, making it very DIY-friendly and quick to install. It requires an underlay to help with sound absorption and moisture resistance but doesn’t require nails or glue.
6. Maintenance
- Engineered Hardwood: Requires more careful maintenance, as it’s natural wood. Clean with a damp (not wet) mop and avoid harsh chemicals. Over time, depending on the thickness of the veneer, engineered hardwood can be sanded and refinished once or twice.
- Laminate Flooring: Easier to maintain, as it can be cleaned with regular sweeping and a damp mop. However, laminate cannot be sanded or refinished, so any significant damage requires plank replacement.
7. Lifespan
- Engineered Hardwood: Depending on the quality and veneer thickness, engineered hardwood can last 20-30 years or more, especially if it can be refinished.
- Laminate Flooring: Typically lasts 10-20 years, depending on quality and wear. It cannot be refinished, so its lifespan may be shorter in high-traffic areas.
8. Cost
- Engineered Hardwood: Generally more expensive than laminate flooring because it includes real wood. Prices vary based on the wood species, veneer thickness, and brand.
- Laminate Flooring: Generally more affordable than engineered hardwood, making it a budget-friendly option for homeowners who want the look of wood without the price tag.
9. Eco-Friendliness
- Engineered Hardwood: Considered more eco-friendly, as it uses less hardwood and can be produced from sustainably sourced wood.
- Laminate Flooring: Made from synthetic materials, often including formaldehyde or VOCs, though some brands offer low-VOC options.
Summary
- Choose Engineered Hardwood if you want an authentic wood look and feel, have moderate moisture levels, and are willing to invest in a longer-lasting, refinishable floor.
- Choose Laminate Flooring if you need a budget-friendly, scratch-resistant option that can withstand higher moisture and is easy to install and maintain.
Both engineered hardwood and laminate offer different benefits, and the best choice depends on your budget, style preferences, and the room’s environment
Q - Do I need to acclimatise Engineered Hardwood Flooring before installation
Yes, acclimating engineered hardwood flooring before installation is essential to ensure optimal performance and longevity. Acclimation allows the flooring to adjust to the temperature and humidity conditions of the installation environment, minimizing the risk of issues such as warping, buckling, or gaps after installation.
Steps for Proper Acclimation:
- Consult Manufacturer Guidelines: Begin by reviewing the specific acclimation recommendations provided by the flooring manufacturer. These guidelines offer precise instructions tailored to the product, ensuring compliance with warranty requirements and optimal results.
- Prepare the Installation Area: Ensure that the installation site is fully enclosed, with all windows and doors installed, and that the HVAC system is operational. Maintain the area at normal living conditions, typically with a temperature between 15°C to 27°C and relative humidity levels between 30% and 50%. These conditions should be stable for at least five days before and during the acclimation process.
- Unpack the Flooring: Remove the engineered hardwood planks from their boxes and lay them out in the installation area. This exposure allows the flooring to breathe and adjust to the room’s environment. Ensure there is adequate space between planks to facilitate air circulation.
- Monitor Moisture Levels: Use a moisture meter to measure the moisture content (MC) of both the flooring and the subfloor. The goal is to achieve equilibrium moisture content (EMC), where the flooring’s MC aligns with the expected in-use conditions of the environment. This alignment helps prevent moisture-related failures like cupping, crowning, or warping.
- Duration of Acclimation: The acclimation period can vary based on the manufacturer’s recommendations and the specific environmental conditions. While some manufacturers suggest a minimum of 48 to 72 hours, others may recommend longer periods, especially in areas with significant humidity fluctuations. Always adhere to the manufacturer’s specified timeframe.
By following these steps and adhering to the manufacturer’s specifications, you can ensure that your engineered hardwood flooring is properly acclimated, leading to a successful installation and long-lasting performance.
Q - What is the different installation methods for Engineered wood
Engineered wood flooring offers several installation methods, making it a versatile choice for various environments and skill levels. Here’s a detailed look at each method:
1. Floating Installation (Click-Lock)
- Process: In this method, engineered wood planks are installed by locking them together with a click-lock mechanism, creating a “floating” floor that doesn’t attach to the subfloor. The planks snap into place, forming a continuous, stable surface.
- Subfloor Compatibility: Suitable for concrete, plywood, and existing flooring. Works well over underlay and can also accommodate radiant heating systems.
- Advantages: Quick and easy, especially for DIY projects. The floating installation also makes it easier to remove or replace if needed.
- Considerations: Requires an expansion gap around the perimeter to allow for natural movement, which is typically covered with baseboards or trim. It’s important to use an underlay with moisture and sound absorption properties.
2. Glue-Down Installation
- Process: In a glue-down installation, each plank is adhered directly to the subfloor using an adhesive. Glue-down installation is often used over concrete subfloors but works on plywood and other surfaces as well.
- Subfloor Compatibility: Ideal for concrete, plywood, and other smooth, dry, and clean surfaces.
- Advantages: Provides a solid and stable surface with reduced movement and noise. Glue-down installations are especially suitable for high-traffic areas and add a slight cushion to the floor, enhancing comfort.
- Considerations: Requires precision and skill, as working with adhesives can be messy and challenging to adjust once planks are in place. Professional installation is often recommended. It’s also essential to choose the right adhesive for the subfloor and environment (e.g., moisture barriers may be necessary).
3. Nail-Down Installation
- Process: Planks are secured by nailing or stapling them to a wood subfloor. Each plank is nailed at an angle through the tongue side, anchoring it to the subfloor and creating a tight fit.
- Subfloor Compatibility: Limited to wood subfloors like plywood or OSB (oriented strand board). Not suitable for concrete or other hard surfaces.
- Advantages: Offers a solid, traditional installation that closely mimics the feel of solid hardwood. It’s very stable and long-lasting, making it a good option for areas where the floor is unlikely to be replaced frequently.
- Considerations: Requires specialized tools, such as a flooring nailer or stapler. This method is labor-intensive and typically recommended for professionals. Expansion gaps around the room’s perimeter are still necessary to allow for natural wood movement.
4. Staple-Down Installation
- Process: Similar to nail-down installation, but uses staples rather than nails to secure each plank to the subfloor. The staples are angled through the tongue of the plank, securing it to the wood subfloor.
- Subfloor Compatibility: Suitable for wood subfloors like plywood or OSB. Not recommended for concrete or other hard surfaces.
- Advantages: Faster than the nail-down method because staples are easier to apply. Provides a firm, stable installation with minimal movement.
- Considerations: Also requires specialized equipment, such as a flooring stapler. Like nail-down installations, this method generally benefits from professional installation. Expansion gaps are needed around the edges of the room.
5. Double Glue-Down Installation (For Floating Subfloors)
- Process: In this method, the underlay is glued to the subfloor first, and then the engineered wood planks are glued to the underlay. This method is popular in multi-story buildings for its soundproofing benefits.
- Subfloor Compatibility: Suitable for concrete and other smooth, clean, and dry surfaces.
- Advantages: Provides enhanced sound insulation and a strong, stable surface. This method is often used in high-rise buildings or apartments where soundproofing is essential.
- Considerations: Double glue-down requires a moisture barrier if installed over concrete, as moisture can seep through. It can be a complex and time-consuming process and often requires professional installation for best results.
Summary of Considerations for Each Installation Method
- Floating (Click-Lock): Ideal for DIY, requires expansion gaps, and an underlay.
- Glue-Down: Stable, low noise, suitable for concrete, needs careful adhesive selection.
- Nail-Down: Traditional, stable, only for wood subfloors, requires professional tools.
- Staple-Down: Quicker than nail-down, wood subfloors only, professional equipment.
- Double Glue-Down: Excellent for soundproofing in multi-story buildings, requires moisture barrier and professional handling.
Choosing the Right Method
The best installation method depends on your subfloor type, environment, and skill level. Following the manufacturer’s installation guidelines is crucial to ensure the flooring’s durability, warranty, and performance, especially regarding specific adhesive types and expansion gap requirements
Q - Do Engineered hardwood planks need to be staggered installed
Yes, engineered hardwood planks should be staggered during installation. Staggering means that the end joints of the planks are offset from each other in adjacent rows. This pattern not only enhances the floor’s appearance but also improves stability and prevents structural issues.
Reasons to Stagger Engineered Hardwood Planks
Aesthetic Appeal: Staggering the planks creates a visually pleasing, natural look. Randomly placed joints avoid a repetitive pattern, giving the floor a more authentic and professional appearance.
Strength and Stability: Staggered planks distribute the weight across the floor more evenly. If planks are aligned without staggering, it can weaken the floor structure, increasing the risk of buckling, gaps, or other issues.
Minimizes Joint Gaps and Lifting: Staggering the planks prevents the formation of weak points along continuous lines. This offset pattern keeps the floor tightly interlocked and reduces the chances of planks shifting or separating over time.
Recommended Staggering Guidelines
- Minimum Distance: It’s generally recommended to stagger planks by at least 150 mm (6 inches) to 200 mm (8 inches) from the end joints in adjacent rows. This distance prevents joints from aligning and creates a more random, natural look.
- Randomized Pattern: Avoid creating a uniform, “brick-like” pattern, which can look artificial. Instead, vary the lengths of the end planks in each row for a more natural, random appearance.
- Follow Manufacturer Instructions: Some engineered hardwood products may come with specific recommendations for staggering distances, so it’s essential to follow the manufacturer’s guidelines.
How to Stagger Planks
- Start with Different Lengths: Begin the first row with a full plank, the next row with a shorter plank, and vary the length for subsequent rows.
- Cut End Pieces Carefully: Use leftover cuts from one row to start another row, if they’re long enough. This helps achieve a staggered effect while minimizing waste.
- Check Each Row: Before securing the planks, lay them out to visualize the stagger and ensure no joints are lining up too closely.
Staggering engineered hardwood planks is a fundamental part of installation that not only enhances the floor’s appearance but also adds to its durability and longevity.
Q - Can Engineered hardwood be installed over underfloor heating
Yes, engineered hardwood can generally be installed over underfloor heating systems, making it a popular choice for homeowners who want the look of wood while benefiting from radiant heat. Engineered wood is more dimensionally stable than solid hardwood due to its layered construction, which helps it withstand the temperature fluctuations associated with underfloor heating. Here’s what you need to know about installing engineered hardwood over underfloor heating:
1. Compatibility with Underfloor Heating Systems
- Hydronic (Water-Based) Systems: Engineered hardwood works well with hydronic heating systems, which use hot water circulated through pipes under the floor. This system heats the floor gradually and evenly, which is ideal for engineered wood.
- Electric (Cable-Based) Systems: Electric systems can also be compatible, but they tend to heat up faster than water-based systems, which can increase the risk of overheating the wood. It’s essential to monitor and control the temperature closely with electric systems.
2. Choosing the Right Engineered Hardwood
- Manufacturer Recommendations: Always check with the manufacturer to ensure the specific engineered hardwood product is rated for use over underfloor heating. Many manufacturers provide guidelines and specify whether their product is suitable for radiant heating.
- Thickness and Veneer Layer: Opt for engineered hardwood with a total thickness between 15-18 mm. Thinner boards may be more responsive to heat, but they could also lack durability, while thicker boards may reduce heat transfer.
- Stable Core Layers: Engineered wood with a plywood or high-density fiberboard (HDF) core is typically more stable and better suited to handle the fluctuations in temperature from radiant heat.
3. Installation Method
- Floating Installation: A floating floor (click-lock installation) is common for underfloor heating. It allows the floor to expand and contract with temperature changes without stress. An appropriate underlay for heated floors should be used to ensure effective heat transfer and to allow the floor to “float” above the heat source.
- Glue-Down Installation: If using a glue-down installation, select an adhesive specifically rated for use with underfloor heating. This method creates better contact with the subfloor, improving heat transfer, but requires careful selection of a heat-resistant adhesive.
- Nail-Down Installation: This method is not recommended for installations over underfloor heating as it can restrict the floor’s natural movement and may impact heating efficiency.
4. Temperature and Humidity Control
- Maximum Temperature: The surface temperature of the wood floor should generally not exceed 27°C (80°F) to prevent damage. Exceeding this temperature can cause the wood to dry out, leading to warping or cracking.
- Gradual Temperature Changes: Raise and lower the temperature gradually when turning the heating system on or off, especially at the beginning or end of the season. Sudden changes can stress the wood and lead to expansion or contraction issues.
- Humidity Control: Maintain a relative humidity level between 30-50% to prevent the wood from drying out or absorbing too much moisture, both of which can cause movement in the wood.
5. Using an Appropriate Underlay
- Underlay for Heated Floors: Choose an underlay specifically designed for underfloor heating. These underlays allow heat to pass through effectively while providing moisture protection and sound insulation.
- Moisture Barrier: If installing over a concrete subfloor, use a moisture barrier to protect the engineered wood from any residual moisture in the concrete, which could damage the wood over time.
6. Flooring Maintenance
- Routine Cleaning: Regularly sweep and mop with a damp cloth to prevent dust and debris from scratching the floor. Avoid using excess water, as engineered wood is still sensitive to moisture.
- Protective Pads: Use protective pads under furniture and area rugs in high-traffic areas to reduce wear and extend the floor’s life, especially given the temperature fluctuations from the heating system.
Summary of Key Points
- Check Compatibility: Verify with the manufacturer that your engineered hardwood is rated for underfloor heating.
- Optimal Installation: Use a floating or glue-down method, with a heat-friendly underlay or adhesive.
- Temperature Limits: Do not exceed a surface temperature of 27°C (80°F), and avoid rapid temperature changes.
- Humidity Control: Maintain indoor humidity between 30-50%.
- Use the Right Underlay: Choose underlay designed for radiant heat to allow proper heat transfer.
Engineered hardwood flooring can be an excellent choice for underfloor heating systems if installed and maintained correctly, offering a warm, comfortable, and beautiful surface that is both practical and aesthetically pleasing
Q - Why do I need to order 10% extra flooring for wastage
Ordering 10% extra engineered wood flooring is recommended to account for various types of waste and ensure you have enough material to complete your project seamlessly. Here are the main reasons for this:
1. Cutting and Fitting Waste
- Trimming to Fit: During installation, planks need to be trimmed to fit the edges of the room, corners, and around obstacles (like doorways, vents, or built-ins). These cuts can result in small, unusable pieces, so having extra material compensates for this.
- Staggered Pattern: Engineered wood floors are installed with a staggered pattern, which requires cutting planks to different lengths. Some pieces may not be reusable in the same row and will become waste.
2. Room Shape and Layout
- Irregular Room Shapes: Non-square or non-rectangular rooms, or rooms with alcoves and other architectural features, will require more cutting and fitting, increasing waste.
- Multiple Rooms: If installing in multiple rooms, each room will need specific cuts to fit its unique layout, further increasing waste.
3. Future Repairs
- Matching Replacement Planks: Having extra flooring on hand is helpful in case of future damage (like scratches, dents, or water damage). Flooring styles and colors can change or be discontinued, so having a few extra planks from the same batch ensures a perfect match for any needed repairs.
4. Defective or Damaged Planks
- Natural Variations: Engineered hardwood planks may have natural imperfections or variations in color and grain that may not suit your specific layout or design preferences.
- Damage During Installation: Some planks can be accidentally damaged during installation. Having extra allows you to replace any planks that may get scratched or damaged.
Why 10% is Standard
The 10% extra is a rule of thumb to cover these potential issues. For rooms with a lot of angles or obstructions, or for larger projects, some installers might even recommend a slightly higher overage of 12-15%.
In summary, ordering 10% extra engineered wood flooring helps account for cutting waste, fitting around obstacles, potential future repairs, and any defects or damage. This precaution ensures you have enough material to complete your project smoothly and keeps your floor looking consistent and seamless.
Q - What is the best direction to install my Engineered Wood Flooring in
The best direction to install your engineered wood flooring depends on factors such as room layout, light sources, structural elements, and personal preference. Here are some guidelines to help you decide:
1. Parallel to the Longest Wall or Main Light Source
- Most Common Choice: Installing planks parallel to the longest wall (or main light source) in the room creates a sense of flow and makes the space feel larger. This direction works well in most rectangular rooms, as it visually elongates the space.
- Light Enhancement: Installing planks in the direction of natural light (usually from windows) can enhance the room’s appearance by minimizing visible seams and shadows, creating a smooth, continuous look.
2. Perpendicular to Floor Joists
- Structural Stability: Laying the flooring perpendicular to floor joists (the structural support beneath the subfloor) adds stability to the floor, reducing the risk of sagging or flexing. This is especially important if the subfloor has any imperfections.
- Essential for Floating or Nail-Down Installations: This is particularly recommended for floating or nail-down installations to maintain structural integrity and a more stable surface.
3. Room Flow and Sightlines
- Open-Plan Areas: In open floor plans, consider installing the planks in a direction that flows with the main living area or entry points to create a seamless visual transition.
- Sightline Alignment: For hallways and entryways, installing planks parallel to the path of travel (following the length of the hallway) enhances visual flow and makes the space feel more expansive.
4. Diagonally for a Unique Look
- Distinctive Style: Diagonal installation, typically at a 45-degree angle, adds a unique design element, creating visual interest and making the space appear larger. It’s a bit more challenging to install but can be very impactful in square or large open rooms.
- Increased Wastage: Diagonal installations require more cuts and can result in extra waste, so ordering 15% extra flooring is usually recommended for this pattern.
5. Herringbone or Chevron Patterns for Style
- Adds Character: Herringbone or chevron patterns create an elegant, classic look and are ideal for adding character to formal spaces like dining rooms or entryways.
- Skill Required: These patterns are more complex and typically require professional installation. They also require more material due to the pattern cuts, so order additional flooring.
Additional Tips
- Room Shape: For square rooms, plank direction may be more flexible since the space is symmetrical. For rectangular rooms, a direction parallel to the longest wall is often best.
- Multiple Rooms: In multi-room installations, consistent plank direction across rooms can create a cohesive flow. In rooms where a change of direction is necessary, transition strips or thresholds can be used between rooms.
Summary
- Run planks parallel to the longest wall in rectangular rooms or towards the primary light source for the most common, visually pleasing layout.
- Install perpendicular to floor joists for added stability, especially in nail-down or floating installations.
- Diagonal or patterned installations add unique style and require extra material and skill.
Choosing the right direction enhances both the appearance and functionality of your engineered wood flooring, so consider room shape, structural stability, and design preference when deciding
Q - Different floor profiles for Engineered Wood - Expansion Transition Adjustment Reducers and End Profiles
When installing engineered wood flooring, various floor profiles (moldings) are used to create smooth transitions, cover expansion gaps, and accommodate changes in floor height. These profiles come in several materials and finishes, including aluminum (powder-coated or wood-wrapped) and solid wood (commonly oak). Here’s an overview of the main types of profiles and their uses:
1. Expansion Profiles
- Purpose: Expansion profiles are used to cover expansion gaps between sections of flooring, allowing the wood to expand and contract with temperature and humidity changes.
- Application: Typically placed between rooms or areas where the flooring continues, such as doorways or large open-plan areas.
2. Transition Profiles
- Purpose: Transition profiles are used to connect engineered wood to other types of flooring (e.g., tile, carpet, or vinyl) where there may be slight height differences.
- Application: Ideal for transitions between rooms with different flooring materials, ensuring a smooth, safe transition and preventing tripping hazards.
3. Adjustment or Reducer Profiles
- Purpose: Reducer profiles help bridge height differences between engineered wood and lower floor surfaces, such as vinyl or tile, creating a sloped, smooth transition.
- Application: Commonly used when transitioning between engineered wood flooring and lower-profile surfaces to prevent tripping and give a finished look.
4. End Profiles (Edge Profiles)
- Purpose: End profiles are used to cap off the edges of engineered wood flooring, typically where the flooring meets walls, thresholds, or other surfaces where an expansion gap is needed.
- Application: Ideal for finishing at doorways, fireplaces, or against sliding doors and windows where there’s no adjoining flooring.
Material Comparison
- Aluminum Profiles (Powder-Coated): Known for durability and resistance to wear, powder-coated aluminum profiles are low-maintenance, ideal for high-traffic areas, and available in a range of neutral colors.
- Aluminum Profiles (Wood-Wrapped): These profiles offer the durability of aluminum with the aesthetic appeal of wood, matching the floor’s look while withstanding daily wear.
- Solid Oak Profiles: Oak profiles are best for a natural, authentic finish that matches engineered wood floors, especially if oak. They’re slightly less durable than aluminum but add elegance and continuity to the flooring.
Summary of Profile Functions and Best Uses
- Expansion Profiles: Covers expansion gaps, allowing wood to move naturally (good for doorways and long expanses).
- Transition Profiles: Connects engineered wood with other flooring types, creating a smooth transition.
- Reducer Profiles: Bridges height differences, providing a gradual slope between uneven surfaces.
- End Profiles: Caps off the edges of flooring against walls, doorways, or windows.
Using the right profiles in aluminum or solid oak provides a clean, professional finish to engineered wood flooring, helping it look polished and maintaining its functionality across room transitions and floor level changes
Q - What is HDF board and plywood used for the core of Engineered wood floors
The core of engineered wood flooring is typically made from either High-Density Fiberboard (HDF) or plywood. Both materials provide stability, durability, and moisture resistance, helping engineered wood flooring outperform solid hardwood in various environments. Here’s a closer look at each material and its specific qualities in engineered wood flooring:
1. High-Density Fiberboard (HDF) Core
- What It Is: HDF is a type of engineered wood product made from highly compressed wood fibers. It’s created by breaking down wood into fibers, mixing them with resin, and then compressing them under high pressure to form a dense, durable board.
- Characteristics:
- Density: HDF is denser than plywood, making it strong and able to support a thinner wood veneer on top.
- Smoothness: HDF has a very smooth and consistent surface, which is ideal for locking mechanisms used in floating installations.
- Water Resistance: While not fully waterproof, HDF is more water-resistant than traditional particle board, making it suitable for areas with moderate moisture levels.
- Advantages in Engineered Wood Flooring:
- Stability: HDF’s high density makes it highly stable, with minimal expansion and contraction due to temperature and humidity changes.
- Durability: Its strength supports a more rigid locking mechanism for click-lock floating installations, which are popular for DIY projects.
- Cost-Effectiveness: HDF is generally more affordable than plywood, making it a good choice for cost-effective engineered wood floors.
- Best Uses: HDF is often used for floating floors or click-lock engineered wood floors, where stability and ease of installation are priorities. It’s commonly found in budget-friendly or DIY-oriented flooring products.
2. Plywood Core
- What It Is: Plywood is an engineered wood product made by gluing together multiple layers (or “plies”) of thin wood veneers. These layers are stacked in alternating grain directions, which enhances the core’s stability and moisture resistance.
- Characteristics:
- Cross-Layered Construction: The alternating grain structure of plywood provides excellent dimensional stability, as the layers resist warping and buckling by balancing each other out.
- Durability: Plywood is strong and durable, giving engineered wood flooring a robust core that can handle high-traffic areas and moderate moisture.
- Thickness Options: Plywood can come in different thicknesses, allowing for thicker engineered wood planks, which may offer additional refinishing potential.
- Advantages in Engineered Wood Flooring:
- Dimensional Stability: The cross-layered structure makes plywood cores highly resistant to expansion, contraction, and warping due to moisture, making it suitable for various climates and levels of humidity.
- Moisture Resistance: Although not waterproof, plywood is more moisture-resistant than solid wood cores, which makes it suitable for areas where solid hardwood may not perform as well.
- Refinishing Potential: Plywood cores are often used in thicker engineered wood planks, which may allow for refinishing once or twice over the floor’s lifespan.
- Best Uses: Plywood is often used in high-quality engineered wood floors, particularly those that are nailed or glued down. It’s suitable for installations over both wood and concrete subfloors and is ideal for environments with varying humidity levels.
Summary Comparison
| Feature | HDF Core | Plywood Core |
|---|---|---|
| Stability | Very stable, minimal expansion/contraction | Highly stable, excellent resistance to warping |
| Moisture Resistance | Moderate | Higher moisture resistance than HDF |
| Density | Very high density, smooth, and uniform | Dense, with layered structure for added strength |
| Installation | Often used for floating, click-lock installations | Suited for floating, glue-down, or nail-down methods |
| Cost | Generally more affordable | Typically more expensive |
| Refinishing | Limited, as the top veneer is typically thin | Allows for some refinishing (if top layer is thick) |
Choosing Between HDF and Plywood Cores
- HDF Core: Best for floating installations, click-lock systems, and budget-conscious buyers who need a durable and stable floor.
- Plywood Core: Ideal for higher-end installations, especially in environments with humidity variations, or for those who prefer glue-down or nail-down methods. It’s also a good choice when thicker engineered wood planks with refinishing potential are desired.
Both HDF and plywood provide the necessary stability and strength for engineered wood floors, but plywood generally offers more versatility and moisture resistance, especially in premium flooring options.
Q - How do I get the shine of my Engineered wood floor to increase
To increase the shine of your engineered wood floor, you can take several steps to enhance its luster while maintaining its finish. Here’s a guide on how to do it safely and effectively:
1. Regular Cleaning and Dusting
- Dust and Sweep Daily: Dust and dirt particles can dull the shine of the floor over time. Use a microfiber mop or soft broom to remove dust daily.
- Vacuum Weekly: Use a vacuum with a hardwood floor attachment to remove dirt from between the planks. Avoid using a beater bar, as it can scratch the surface.
2. Use a Damp Mop with a pH-Neutral Cleaner
- Choose a Hardwood-Friendly Cleaner: Use a pH-neutral or specially formulated hardwood floor cleaner. Avoid harsh chemicals or abrasive cleaners, as these can strip away the finish and dull the floor.
- Damp Mop Only: Use a microfiber mop that is only slightly damp (never wet). Excess moisture can damage the floor and dull the finish over time.
3. Polish the Floor Periodically
- Use a Floor Polish: Apply a high-quality floor polish designed for engineered wood. Floor polish restores luster, fills minor scratches, and adds a protective layer. Be sure it’s compatible with your floor’s finish type (like urethane or polyurethane).
- Frequency: Apply polish every 2-3 months, or as needed based on foot traffic. Use sparingly, as over-polishing can cause buildup and a cloudy look.
4. Buffing for a Quick Shine Boost
- Buff with a Soft Cloth: Use a microfiber or soft cloth to manually buff the floor, working in circular motions. This technique can enhance shine without needing any product.
- Use a Buffing Machine: For larger areas, a buffing machine with a soft pad can make the floor shine, especially if it has a urethane or polyurethane finish. Ensure the pad is soft to prevent scratching.
5. Avoid Harsh and Waxy Products
- Avoid Waxes: Traditional wax products aren’t suitable for most engineered wood finishes and can create a dull, sticky buildup over time.
- Skip Oil-Based Cleaners: Oil soaps and other oil-based cleaners can leave a residue on engineered wood floors, making them look dull and possibly damaging the finish.
6. Protect from Direct Sunlight
- Use Curtains or Blinds: Direct sunlight can fade and dull engineered wood floors over time. Consider using curtains or blinds during the brightest parts of the day to protect your floor.
- Furniture Pads and Rugs: Place pads under furniture legs to prevent scratches, and use area rugs in high-traffic areas to protect the finish.
7. Consider Refinishing if Necessary
- If your engineered wood floor has lost its shine due to wear, and if the veneer layer is thick enough, professional refinishing may restore its luster. Engineered floors can often be sanded and refinished once or twice, depending on the thickness of the top layer.
Summary of Steps to Increase Shine
- Dust and sweep daily, and vacuum weekly.
- Use a pH-neutral cleaner with a damp microfiber mop.
- Polish every few months with a hardwood-safe polish.
- Buff the floor with a soft cloth or a buffing machine.
- Avoid waxes, oil-based cleaners, and excess sunlight exposure.
Following these steps will help keep your engineered wood floor looking shiny and beautiful, while also extending its lifespan.
Q - Can I install Engineered Wood Floors over carpets
Installing engineered wood flooring directly over carpet is generally not recommended. Carpet is a soft, unstable surface that can cause various issues when used as a subfloor for engineered wood. Here’s why it’s problematic and some potential alternatives:
Why Installing Over Carpet Isn’t Recommended
Instability and Uneven Surface: Carpet provides a soft, cushioned surface that can cause engineered wood planks to move, shift, or even separate over time. This movement makes the floor less stable and can lead to creaks or gaps.
Moisture and Mold Risk: Carpet traps moisture, which can become a breeding ground for mold and mildew. Installing engineered wood over carpet can trap this moisture, damaging the wood and potentially leading to mold growth under the floor.
Height and Transition Issues: The extra thickness of both the carpet and engineered wood can create height issues at doorways and transitions to other flooring, resulting in tripping hazards and unsightly edges.
Warranty Concerns: Many flooring manufacturers specify that engineered wood should be installed over solid, stable subfloors like plywood or concrete. Installing over carpet may void the warranty on your engineered wood flooring.
Alternatives to Installing Over Carpet
If you’re looking to install engineered wood flooring in a carpeted room, here are a few options:
Remove the Carpet First: The best approach is to remove the carpet and underlay, then prepare the subfloor beneath. This might involve:
- Cleaning and Leveling the Subfloor: Remove any residual adhesive and make sure the subfloor is clean, level, and dry.
- Installing an Underlay: Once the carpet is removed, add a suitable underlay for engineered wood, especially if doing a floating installation.
Install Over Low-Pile Commercial Carpet (With Caution): In some cases, engineered wood can be installed over thin, low-pile commercial carpet with a very firm backing. However, this should only be considered for floating installations, and the carpet must be stable, flat, and moisture-free. Even in this scenario, it’s best to consult the flooring manufacturer for their recommendation.
Use Interlocking Floating Floor Over Carpet Tiles: If removing the carpet isn’t possible and you’re looking for a temporary solution, consider using a high-quality, interlocking floating floor system over low-pile carpet tiles. This approach is generally not suitable for long-term installation, but it can be a quick, semi-permanent solution.
Preparing for a Permanent Installation
For the most stable, long-lasting results, it’s best to remove the carpet completely and work with a clean, solid subfloor. After carpet removal, an underlay suited to engineered wood can be installed, providing moisture protection, sound absorption, and stability for the new flooring.
Summary
Installing engineered wood over carpet is not advisable because it compromises stability, may cause moisture issues, and can void the flooring warranty. For a lasting installation, remove the carpet, prepare the subfloor, and use a suitable underlay. This method ensures a stable, durable, and beautiful engineered wood floor
Q - Do Enigineered Wood Flooring require a DPM damp proof membrane
Yes, a damp proof membrane (DPM) is recommended for engineered wood flooring installations, especially when installing over concrete or in environments where moisture is a concern. Although engineered wood is more moisture-resistant than solid wood, it can still be damaged by prolonged exposure to moisture, so a DPM provides an added layer of protection.
When a DPM is Needed
Concrete Subfloors: Concrete can retain moisture, which can rise up and affect the wood. A DPM is essential to prevent moisture from seeping into the engineered wood from below.
Ground Floor or Basement Installations: Floors on ground level or below grade (basement) are prone to higher moisture levels. A DPM acts as a barrier against moisture that could seep up from the earth.
High-Humidity Areas: In locations with high humidity, a DPM helps prevent moisture-related issues like warping or swelling, extending the lifespan of the floor.
Underlay with Integrated DPM: Some underlays come with an integrated DPM layer, combining moisture protection with sound absorption and cushioning. This type of underlay is particularly useful for floating installations of engineered wood floors.
Installation Methods and DPM Requirements
- Floating Installations: A DPM is commonly recommended for floating floors, as they don’t adhere directly to the subfloor and may be more vulnerable to moisture.
- Glue-Down Installations: If gluing down engineered wood over concrete, a liquid DPM or moisture barrier may be applied to the concrete first. Some adhesives are also designed with moisture barriers built in, so consult the manufacturer for the correct adhesive type.
- Nail-Down Installations: Typically done over wooden subfloors, a DPM isn’t usually needed. However, if the wood subfloor is on or below grade, a DPM beneath the subfloor might still be recommended.
How to Install a DPM
- Sheet Membrane: Lay the membrane directly on the subfloor, overlapping seams by at least 200 mm and sealing them with moisture-resistant tape.
- Liquid DPM: Spread a liquid DPM over the concrete with a roller or brush, creating a waterproof layer. Ensure it dries fully before proceeding with the flooring installation.
Summary
A damp proof membrane is recommended for engineered wood flooring installations over concrete, ground floors, basements, or in high-humidity environments. Using a DPM helps protect against moisture, prolongs the floor’s life, and ensures stability, especially in floating or glue-down installations. Always check manufacturer recommendations, as specific guidelines for DPM use may vary.
Q - How to repair minor scratches on Engineered Wood Flooring
Repairing minor scratches on engineered wood flooring is relatively simple and can help keep your floor looking smooth and polished. Here are a few effective methods, depending on the depth of the scratch and the type of finish on your floor:
1. Use a Wood Repair Marker or Stain Pen
- Best For: Superficial scratches and light scuffs.
- How To: Select a wood repair marker or stain pen that closely matches the color of your floor. Clean the area, then gently run the marker along the scratch, filling in the color. Allow it to dry, and if necessary, gently buff with a soft cloth to blend.
- Benefits: Quick, easy, and inexpensive. Provides an instant fix for light scratches and restores color consistency.
2. Apply a Wax Filler Stick
- Best For: Minor scratches and small dents.
- How To: Choose a wax filler stick in a matching color. Rub the stick over the scratch until it fills the groove, then use a plastic scraper to smooth the surface gently. Buff the area with a soft cloth to blend.
- Benefits: Wax sticks work well on slightly deeper scratches and can fill in small dents, creating a seamless look.
3. Use a Wood Floor Repair Kit
- Best For: More visible scratches and minor surface damage.
- How To: Wood floor repair kits typically include a filler compound, a selection of colors to mix, and an applicator. Mix the colors to match your floor, apply the filler to the scratch, and smooth it out. Once dry, buff with a soft cloth.
- Benefits: Repair kits provide a professional-looking finish, especially for scratches that are more noticeable. They also work well on engineered wood with different finishes, as you can match the color precisely.
4. Apply a Floor Polish or Scratch Remover Solution
- Best For: Light surface scratches that don’t penetrate deeply.
- How To: Clean the floor, then apply a hardwood floor polish or scratch remover solution according to the product instructions. Use a soft cloth to gently buff the scratched area, blending it with the surrounding surface.
- Benefits: Floor polish can restore shine and conceal light scratches, making it look refreshed and uniform.
5. Use Coconut Oil or Olive Oil for a Natural Fix
- Best For: Very light surface scuffs.
- How To: Dab a small amount of coconut or olive oil on a soft cloth and rub it into the scratch in a circular motion. Leave it for a few minutes, then buff with a clean cloth.
- Benefits: Provides a quick and easy way to minimize the appearance of superficial scratches without affecting the floor’s finish. Natural oils can enhance the shine of the floor temporarily.
6. Light Sanding and Reapplying Finish (For Floors with a Thicker Veneer)
- Best For: Deeper scratches on floors with a thicker wear layer.
- How To: Lightly sand the scratched area with fine-grit sandpaper (e.g., 320-grit). Wipe away dust, then apply a matching wood finish or sealant to blend with the surrounding area.
- Benefits: Ideal for engineered floors that have a thicker veneer layer, allowing for light refinishing.
Tips for Best Results
- Match Colors Carefully: Take the time to match the repair product color to your floor. A close match will make the repair virtually unnoticeable.
- Test First: Before applying any product on a large scratch, test in a small, inconspicuous area to ensure it blends well and doesn’t harm the finish.
- Avoid Excessive Moisture: Use minimal water when cleaning before and after repair, as excessive moisture can damage engineered wood.
Summary
To repair minor scratches on engineered wood floors, use a wood repair marker, wax filler stick, repair kit, or floor polish for light scratches. For deeper scratches on thicker veneer layers, consider light sanding and reapplying a matching finish. Regular maintenance and prompt scratch repair can keep your floor looking great for years
Q - What the the advantages of Engineered Wood Flooring
Engineered wood flooring offers several advantages that make it a popular choice among homeowners and commercial spaces alike. Here are the key benefits:
1. Stability and Resistance to Temperature and Humidity Changes
- Multi-Layered Construction: Engineered wood is made up of a top layer of real hardwood and a core of plywood or high-density fiberboard (HDF) layers. This construction minimizes expansion and contraction due to temperature and humidity changes, making it more stable than solid hardwood.
- Ideal for Varied Climates: It performs well in environments with seasonal humidity changes, making it suitable for basements and kitchens where solid hardwood may be prone to warping.
2. Natural Wood Appearance
- Real Hardwood Veneer: The top layer is real hardwood, giving it the authentic look and feel of solid wood. It comes in a variety of species, grains, and finishes, providing the aesthetic appeal of hardwood.
- Natural Texture and Grain: Unlike synthetic floors, engineered wood has natural wood grains, texture, and color variations, offering a timeless, high-quality look.
3. Versatile Installation Options
- Various Installation Methods: Engineered wood can be installed using floating (click-lock), glue-down, or nail-down methods, allowing flexibility to match different subfloors and installation preferences.
- Installation Over Multiple Surfaces: It can be installed over a range of subfloors, including concrete, plywood, or even existing flooring. This makes it a versatile choice for many rooms, including those with radiant heating.
4. Moisture Resistance
- Higher Moisture Tolerance: While it’s not waterproof, engineered wood is more resistant to moisture than solid wood due to its layered structure. This makes it suitable for kitchens, basements, and other areas where moderate moisture exposure may occur.
5. Eco-Friendly and Sustainable
- Less Hardwood Use: Because engineered wood uses a thin layer of hardwood, it requires less solid wood than traditional hardwood flooring, reducing the demand on hardwood resources.
- Sustainable Production: Many manufacturers source the hardwood veneer from sustainably managed forests, making engineered wood a more eco-conscious choice.
6. Easy Maintenance and Durability
- Scratch Resistance: High-quality engineered wood often comes with a protective finish, making it more resistant to scratches and wear compared to unfinished solid wood.
- Easy Cleaning: Engineered wood can be cleaned with gentle sweeping and occasional damp mopping. Its finished surface is resistant to staining and dirt accumulation, making it low-maintenance.
7. Refinishing Potential
- Refinishing Capability: Some engineered wood floors with a thicker hardwood veneer can be sanded and refinished one or two times, extending the floor’s life and allowing homeowners to refresh the appearance if needed.
- Long Lifespan: With proper care, engineered wood flooring can last 20-30 years or longer, particularly if it has a thicker veneer and has been refinished over time.
8. Cost-Effective Alternative to Solid Hardwood
- Lower Cost for High-End Looks: Engineered wood offers the appearance of hardwood at a more affordable price. The layered construction is typically less costly than using solid wood planks of the same species and grade.
- Reduced Installation Costs: The ease of installation, especially with floating methods, can reduce labor costs if installed professionally and can also be a cost-saving choice for DIY projects.
9. Increased Property Value
- Premium Look: Engineered wood is considered a quality, long-lasting flooring option that can enhance a home’s market value and appeal.
- High-End Finish Options: Available in a wide range of finishes, stains, and textures, engineered wood flooring can be tailored to match modern, traditional, or rustic decor, adding character to any space.
Summary of Advantages
- Stability and resistance to moisture, making it versatile for various environments.
- Natural wood appearance that mimics solid hardwood.
- Flexible installation options for different subfloors and methods.
- Eco-friendly due to reduced use of hardwood and sustainable sourcing.
- Durable and low-maintenance, with some types offering refinishing potential.
- Cost-effective while providing a high-end look.
- Increases property value with its aesthetic and quality appeal.
Overall, engineered wood flooring combines the beauty of real wood with enhanced durability and versatility, making it a valuable and attractive flooring choice
Q - Is Engineered Hardwood Flooring safe for my Pets and will their nails scratch the floor
Engineered hardwood flooring is generally a safe and pet-friendly option, but it can still be susceptible to scratches from pet nails. Here’s a closer look at how engineered wood performs in pet-friendly homes and ways to protect it:
1. Durability and Scratch Resistance
- Protective Finish: Most engineered hardwood floors come with a durable, factory-applied finish (such as aluminum oxide or polyurethane) that adds a layer of scratch resistance. This finish helps protect against minor scratches from pet nails, making it more resilient than unfinished wood.
- Harder Wood Species: Some wood species are naturally harder and more resistant to scratches (e.g., hickory, maple, and oak). Choosing engineered wood with a harder species can help improve scratch resistance.
2. Susceptibility to Pet Nail Scratches
- Nail Scratches: Despite the protective finish, engineered hardwood can still show scratches from pet nails, especially if the pets are active or have long nails. Over time, scratches may become noticeable, especially in high-traffic areas.
- Less Susceptible than Solid Hardwood: Engineered wood generally holds up better to scratches than solid wood, as its finish often has more durability. However, deeper scratches can still penetrate the veneer layer.
3. Preventive Measures to Protect the Floor
- Keep Pet Nails Trimmed: Regularly trimming your pets’ nails can significantly reduce the chances of scratches. Consider nail caps or smooth nail grinding tools designed to blunt sharp edges.
- Use Rugs and Runners: Place area rugs or runners in high-traffic areas to provide a buffer between your pets’ nails and the floor. This is especially helpful in spots where pets tend to run, such as doorways or hallways.
- Use Pet-Friendly Floor Mats: Place mats under water and food bowls to prevent scratches and protect against spills, as pet bowls can cause scratches or water damage.
- Consider Rugs with Pads: If you’re using rugs, consider using rug pads underneath to prevent sliding and provide extra cushioning, which can help reduce the impact of pet activity on the floor.
4. Regular Maintenance
- Clean Up Spills Promptly: Engineered hardwood is more moisture-resistant than solid wood, but pet water spills or accidents should be cleaned up promptly to prevent moisture from seeping through the finish and causing warping or staining.
- Use Hardwood-Friendly Cleaners: Clean the floor with a pH-neutral cleaner and avoid harsh chemicals that could damage the finish and make the floor more susceptible to scratches.
5. Minor Scratch Repairs
- Use Touch-Up Kits or Wax Sticks: Minor scratches can be concealed using touch-up kits, wax filler sticks, or wood markers. These are useful for light surface scratches that don’t penetrate the finish deeply.
- Polish for Enhanced Protection: Applying a floor polish designed for engineered hardwood can help maintain shine, provide additional protection, and mask small scratches.
Summary
Engineered hardwood flooring is generally pet-safe but may show scratches from pet nails over time, especially if your pets are active. With preventive care—like regular nail trimming, using rugs, and cleaning up promptly—you can minimize the impact of pets on the floor. Regular maintenance and minor touch-ups can also keep your engineered hardwood looking its best, ensuring a pet-friendly, durable, and beautiful floor
Q - What is Herringbone Engineered Hardwood Flooring
Herringbone engineered hardwood flooring is a type of flooring where the planks are arranged in a herringbone pattern, creating a distinctive V-shaped, zigzag layout. This style combines the visual appeal of traditional parquet flooring with the practical benefits of engineered wood. The result is a stylish, stable, and versatile floor that suits both modern and classic interiors.
Characteristics of Herringbone Engineered Hardwood Flooring
- Pattern: The herringbone pattern is achieved by arranging the planks in a way that their short ends meet at a right angle, forming a zigzag or “V” shape. This creates a unique and elegant look that can make a room appear more sophisticated and visually interesting.
- Engineered Construction: Like other engineered hardwood floors, herringbone engineered hardwood consists of a real hardwood top layer (veneer) attached to a plywood or high-density fiberboard (HDF) core. This layered construction provides stability, making it more resistant to moisture and temperature changes than solid wood herringbone floors.
- Pre-Finished Options: Herringbone engineered wood is often pre-finished with protective coatings, such as polyurethane or aluminum oxide, adding durability and eliminating the need for on-site finishing.
Advantages of Herringbone Engineered Hardwood Flooring
- Dimensional Stability: The engineered construction minimizes expansion and contraction due to humidity and temperature, making it suitable for a variety of rooms, including those with radiant heating or moisture exposure.
- Classic Aesthetic Appeal: Herringbone is a timeless pattern that adds a luxurious, high-end look. It works well in traditional, contemporary, and eclectic decor styles.
- Ease of Installation: Unlike traditional solid wood parquet floors, which often require professional installation, some engineered herringbone floors come with click-lock systems or tongue-and-groove edges that simplify installation, making it more DIY-friendly.
- Available in Various Wood Species and Finishes: You can find herringbone engineered wood in oak, walnut, maple, and other hardwood species, with various finishes and colors to match different interior styles.
Installation of Herringbone Engineered Hardwood
Installing herringbone engineered hardwood can be more complex than installing standard plank flooring due to the pattern alignment, so it’s often best done by a professional. There are a few key considerations:
- Subfloor Preparation: The subfloor must be level, clean, and dry. Any unevenness can disrupt the pattern and make it difficult to install the planks correctly.
- Glue-Down or Click-Lock: Herringbone flooring is typically installed using a glue-down method, as it provides stability and prevents shifting over time. Some engineered options may have click-lock or tongue-and-groove systems to simplify installation.
- Layout and Pattern Alignment: Accurate layout and careful alignment of each piece are essential for a seamless herringbone pattern. Installers usually start by establishing a central line, aligning the first rows precisely before continuing to the rest of the room.
Room Suitability
Herringbone engineered hardwood flooring works beautifully in various spaces, including:
- Living Rooms and Dining Rooms: Adds sophistication and visual interest.
- Hallways and Entryways: The pattern makes narrow spaces appear more dynamic.
- Bedrooms and Offices: Brings warmth and elegance to private spaces.
- Kitchens (with moderate moisture control): Provides durability and stability if appropriate cleaning practices are followed.
Summary
Herringbone engineered hardwood flooring combines the timeless elegance of the herringbone pattern with the durability and versatility of engineered wood. It’s a stable and stylish option for various rooms, offering a classic yet contemporary look that can elevate the character of any space.
Q - What is the lifespan of Engineered Hardwood Floors
The lifespan of engineered hardwood floors generally ranges from 20 to 30 years or more, depending on factors such as the quality of the flooring, the thickness of the top hardwood layer, installation method, and maintenance practices. Here’s a closer look at what influences the longevity of engineered hardwood flooring:
1. Quality of the Flooring
- High-Quality vs. Low-Quality: High-quality engineered wood flooring, with a thicker hardwood veneer and durable core, tends to last longer. Premium options can last upwards of 30-40 years, while budget options with thinner veneers may last closer to 15-20 years.
- Top Layer Thickness: Floors with a thicker hardwood veneer (3 mm or more) can often be refinished one or more times, extending their lifespan significantly.
2. Veneer Thickness and Refinishing Potential
- Refinishing: Engineered floors with a veneer layer of at least 2-3 mm can be sanded and refinished once or twice, which helps refresh the floor’s appearance and extend its life. Thinner veneers (under 2 mm) generally cannot be refinished, so they rely on the durability of the factory finish.
- Number of Refinishes: Each refinishing adds years to the floor’s life by removing surface scratches and restoring the finish. However, the number of times a floor can be refinished depends on the thickness of the top layer.
3. Core Construction and Stability
- Plywood vs. HDF Core: Engineered hardwood floors with a high-quality plywood core tend to be more durable and better able to withstand moisture and temperature changes, leading to a longer lifespan.
- Dimensional Stability: The layered construction helps prevent warping, cupping, and other issues caused by humidity changes, which extends the floor’s life.
4. Installation Method
- Proper Installation: Professional installation helps ensure the floor is stable and secure, which reduces wear and tear. Poor installation can lead to issues like shifting, gapping, or lifting that shorten the floor’s lifespan.
- Underlayment and Subfloor Preparation: Using the right underlayment and ensuring the subfloor is level and moisture-protected improves the longevity of engineered hardwood.
5. Maintenance and Care
- Routine Cleaning: Regular cleaning, like dusting, sweeping, and damp mopping with a hardwood-safe cleaner, prevents dirt and grit from scratching the surface, extending the finish’s life.
- Protective Measures: Using area rugs, furniture pads, and avoiding excess moisture can help prevent damage and wear. Also, trimming pet nails and wearing soft-soled shoes can reduce scratches and surface wear.
- Resurfacing: If the top layer allows for refinishing, periodic refinishing or applying a new finish every 5-10 years can refresh the floor and address surface wear.
6. Environmental Factors
- Humidity Control: Maintaining a stable indoor humidity level (30-50%) reduces the risk of expansion and contraction that could otherwise damage the floor. Using humidifiers or dehumidifiers, depending on the climate, can help maintain the ideal range.
- Sunlight Exposure: Engineered wood floors exposed to direct sunlight may fade or discolor over time. Using curtains or blinds can help protect the finish and prolong the floor’s appearance.
Summary of Lifespan Factors
With proper care and maintenance, engineered hardwood floors can last:
- High-End Flooring: 30-40 years (with a thicker veneer that can be refinished multiple times).
- Mid-Quality Flooring: 20-30 years (limited refinishing potential).
- Budget Flooring: 15-20 years (typically no refinishing).
Engineered hardwood flooring, when installed correctly and maintained with care, offers durability and longevity, making it a long-lasting and valuable investment for your home.
Q - Where can and cannot Engineered Hardwood Flooring be installed
Engineered hardwood flooring is a versatile option and can be installed in many areas of a home, but there are some locations where it may not be ideal. Here’s a breakdown of where engineered hardwood can and cannot be installed:
Where Engineered Hardwood Flooring Can Be Installed
Living Rooms, Bedrooms, and Dining Rooms
- Why: These areas generally have stable humidity levels and minimal moisture exposure, making them ideal for engineered hardwood.
- Benefits: Engineered hardwood adds warmth, elegance, and durability, making these spaces feel inviting.
Kitchens
- Why: Engineered wood is more resistant to moisture and temperature fluctuations than solid hardwood, so it can handle occasional spills and changes in humidity.
- Precautions: Clean up spills immediately to prevent moisture from seeping into the seams, and consider mats or rugs in high-traffic areas near sinks and appliances.
Basements (Below-Grade Areas)
- Why: Engineered wood’s layered construction provides greater stability in areas with potential humidity variations, like basements.
- Precautions: Install a moisture barrier or damp-proof membrane (DPM) over the concrete subfloor to prevent moisture from seeping into the wood, and ensure the basement is well-ventilated with consistent humidity control.
Hallways and Entryways
- Why: Engineered wood is durable and resistant to moderate foot traffic, making it suitable for hallways and entryways.
- Precautions: Use rugs or mats in entryways to catch dirt and moisture, reducing wear and tear and protecting the floor from scratches.
Home Offices and Study Rooms
- Why: These rooms usually have stable humidity and temperature levels, making them compatible with engineered hardwood.
- Benefits: Engineered wood adds a professional and cozy atmosphere, ideal for workspaces.
Rooms with Radiant Heating
- Why: Unlike solid hardwood, many types of engineered wood are compatible with radiant heating systems. The layered construction helps withstand the temperature fluctuations.
- Precautions: Confirm with the manufacturer that the specific product is suitable for use with radiant heat, as not all engineered wood products are compatible.
Where Engineered Hardwood Flooring Cannot or Should Not Be Installed
Full Bathrooms (with Showers or Tubs)
- Why Not: Full bathrooms experience high levels of humidity and moisture, which can cause the wood to warp, swell, or delaminate over time.
- Alternative: Consider moisture-resistant or waterproof flooring options, such as tile or luxury vinyl, for full bathrooms.
Laundry Rooms
- Why Not: Laundry rooms have a high potential for water leaks, spills, and high humidity levels, which can damage engineered wood floors.
- Alternative: Tile, vinyl, or other waterproof flooring materials are better suited for laundry rooms.
Outdoor or Semi-Outdoor Spaces (Patios, Porches, Sunrooms)
- Why Not: Engineered hardwood is not designed to withstand outdoor exposure to rain, extreme temperature changes, and UV rays, which can cause it to warp, fade, or deteriorate.
- Alternative: Outdoor-rated flooring materials like tile, stone, or composite decking are more appropriate for outdoor or semi-outdoor spaces.
Areas with Uncontrolled Humidity and Temperature
- Why Not: Engineered wood should be installed in climate-controlled areas with stable indoor humidity (typically 30-50%). Excessive moisture or dryness can cause the wood to expand or contract, leading to gaps, buckling, or warping.
- Precaution: In climates with extreme humidity swings, using a humidifier or dehumidifier can help maintain the indoor environment within the recommended range.
Summary of Installation Locations
- Suitable Areas: Living rooms, bedrooms, dining rooms, kitchens (with care), hallways, entryways, home offices, basements (with a moisture barrier), and rooms with radiant heating.
- Unsuitable Areas: Full bathrooms, laundry rooms, outdoor or semi-outdoor spaces, and areas with uncontrolled humidity or temperature.
Engineered hardwood is versatile and durable but performs best in areas with stable conditions. When installed in appropriate spaces, it can provide a beautiful, long-lasting flooring solution
Q - How do I clean my Engineered Hardwood Floors - Best Practices
Cleaning engineered hardwood floors is straightforward, but using the right methods is essential to maintain their shine and durability. Here are the best practices for keeping your engineered hardwood floors in top shape:
1. Regular Dusting and Sweeping
- Dust Daily: Use a microfiber dust mop or soft-bristle broom to remove dust, pet hair, and dirt daily. This prevents abrasive particles from scratching the finish.
- Vacuum Weekly: Use a vacuum with a hardwood floor attachment (no beater bar) to reach dirt between planks and in corners. Avoid using vacuums with rotating bristles, as these can scratch the floor.
2. Use a Damp Mop Sparingly
- Light Damp Mopping: Occasionally damp mop with a microfiber mop lightly dampened with water or a hardwood floor cleaner. Avoid soaking the mop—too much moisture can damage engineered wood.
- pH-Neutral Cleaner: Use a pH-neutral hardwood floor cleaner specifically designed for engineered wood. Avoid harsh chemicals, vinegar, ammonia, and bleach, as these can strip the finish and dull the floor.
- Mop Direction: Mop in the direction of the wood grain to capture dust and debris effectively, and make sure to dry any residual moisture with a clean, dry mop or cloth.
3. Spot Clean Spills Immediately
- Wipe Up Spills Quickly: Blot spills with a dry or slightly damp cloth as soon as they occur to prevent moisture from seeping into the wood.
- Avoid Excessive Water: Never use large amounts of water or let liquid sit on the floor, as engineered wood is still susceptible to water damage.
4. Avoid Steam Cleaners and Wet Mops
- No Steam Cleaners: Steam cleaners release moisture and high heat, which can cause engineered wood to warp, swell, or delaminate.
- Avoid Wet Mopping: Excess water can damage engineered wood, so stick to lightly damp mopping only when necessary.
5. Polish Periodically
- Use a Floor Polish for Hardwood: Occasionally apply a hardwood floor polish designed for engineered wood to restore shine and protect the finish. Follow the manufacturer’s guidelines for application frequency.
- Buff Lightly: After applying polish, buff the floor with a soft cloth or mop to enhance the shine.
6. Protect the Floor from Scratches and Wear
- Use Area Rugs and Mats: Place mats at entryways and area rugs in high-traffic areas to reduce wear. Make sure the rugs have a non-slip, non-rubber backing to avoid damaging the finish.
- Furniture Pads: Use felt pads under furniture legs to prevent scratches and indentations. Avoid dragging heavy furniture across the floor.
7. Control Humidity Levels
- Maintain Stable Humidity: Keep indoor humidity between 30-50% to minimize expansion and contraction of the wood. Use a humidifier in winter and a dehumidifier in summer, if necessary.
- Ventilate Properly: In kitchens, use exhaust fans when cooking to reduce moisture buildup, and keep the room well-ventilated.
8. Avoid Wax, Oil-Based Cleaners, and Harsh Chemicals
- Skip Waxes and Oils: Wax and oil-based cleaners can leave a residue and may dull the finish, making the floor look cloudy or sticky.
- Avoid Abrasive Cleaners: Steer clear of products containing ammonia, bleach, or acidic ingredients, as these can damage the finish.
9. Use Repair Products for Minor Scratches
- Touch-Up Kits: For minor scratches, use touch-up kits or wax sticks that match your floor’s color. These can help restore the look without affecting the finish.
- Polish for Light Scuffs: Regular polishing can help mask light scuffs and keep the floor looking even.
Quick Cleaning Guide
| Task | Recommended Frequency | Cleaning Method |
|---|---|---|
| Dusting | Daily | Microfiber dust mop or soft-bristle broom |
| Vacuuming | Weekly | Vacuum with hardwood floor attachment |
| Damp Mopping | Monthly or as needed | Lightly damp microfiber mop with hardwood cleaner |
| Spot Cleaning | As needed | Wipe spills immediately with a dry cloth |
| Polishing | Every 2-3 months | Hardwood floor polish, buffed with soft cloth |
Summary of Best Practices
- Dust and sweep daily to prevent dirt buildup and scratches.
- Damp mop sparingly with a pH-neutral cleaner, avoiding excess water.
- Wipe up spills immediately to prevent moisture damage.
- Avoid steam cleaners and wet mops, as these can warp engineered wood.
- Polish periodically to maintain shine and protect the floor’s finish.
With regular cleaning, protective measures, and avoiding harsh chemicals, you can keep your engineered hardwood floors looking beautiful and prolong their lifespan.
Q - Do the Engineered board thickness matter when choosing my new Engineered Hardwood Floor
Yes, the thickness of engineered hardwood boards does matter when choosing your new flooring, as it impacts durability, stability, refinishing options, and suitability for different installation methods. Here’s a breakdown of how board thickness can affect your engineered hardwood floor:
1. Durability and Lifespan
- Thicker Boards Last Longer: Thicker boards (14-20 mm) are generally more durable and can better withstand wear over time. They are less likely to dent or warp compared to thinner boards, making them suitable for high-traffic areas or homes with pets and children.
- More Stability: Thicker boards often have a stronger core, making them more dimensionally stable. This helps prevent movement, especially in areas with fluctuating humidity.
2. Top Layer (Veneer) Thickness and Refinishing Potential
- Refinishing Capability: If you want the option to refinish the floor, choose boards with a thicker veneer layer (usually 2-6 mm). Thicker top layers allow for refinishing once or more over the floor’s lifespan, removing scratches and wear.
- Limited Refinishing for Thin Veneers: Thin veneers (under 2 mm) cannot be sanded or refinished, so once the finish shows signs of wear, the only option is to replace the flooring. For long-lasting floors, opt for a thicker veneer, especially in high-traffic rooms.
3. Installation Options and Subfloor Compatibility
- Floating Installations: Thinner boards (7-12 mm) are often used for floating installations with a click-lock mechanism. They are lighter and easier to install, making them ideal for DIY projects.
- Glue-Down or Nail-Down Installations: Thicker boards (14-20 mm) work well for glue-down or nail-down installations, providing a stable base and enhanced durability. Thicker boards are recommended for installations over wooden subfloors or concrete, as they help maintain stability and longevity.
- Suitable for Uneven Subfloors: Thicker boards may perform better on slightly uneven subfloors, as they’re less likely to flex underfoot.
4. Sound and Insulation
- Better Sound Absorption: Thicker boards can provide better sound insulation, making them a good choice for multi-story buildings, where noise reduction is important. The added thickness helps absorb sound, creating a quieter environment.
- Thermal Insulation: Thicker boards offer slightly better thermal insulation, which can help make rooms feel warmer, particularly in colder climates.
5. Height Considerations and Transition with Other Floors
- Transitions with Other Floor Types: Thicker boards may create height differences at doorways or transitions to other flooring types. This is something to consider if you’re installing engineered wood next to tile, carpet, or vinyl, as thicker boards may require transition strips.
- Door Clearance: Installing thicker boards may reduce door clearance, which could require adjustments or trimming of doors.
Typical Thickness Options and Their Uses
- Thin (7-12 mm): Ideal for floating installations and areas with low traffic. Often used in apartments or rooms with minimal moisture exposure. Thin boards are cost-effective but have limited refinishing options.
- Medium (12-15 mm): Common thickness for many engineered wood floors. Suitable for moderate to high traffic areas with some refinishing potential. Works well for most installations, including floating or glue-down methods.
- Thick (15-20 mm): Durable and long-lasting, with a thick top layer suitable for refinishing. Often used in high-traffic areas or for glue-down installations over wood or concrete. Provides good sound and thermal insulation.
Summary
- Durability and Stability: Thicker boards offer more durability and stability, making them ideal for high-traffic areas.
- Refinishing Potential: Choose a thicker top layer for refinishing options if you want a longer-lasting floor.
- Installation Compatibility: Thicker boards are suitable for various installation methods, including nail-down and glue-down, while thinner boards work well for floating installations.
- Sound and Thermal Benefits: Thicker boards provide better sound and thermal insulation, making rooms quieter and warmer.
Overall, the thickness of engineered hardwood boards affects both the floor’s appearance and functionality, so consider your needs, installation method, and room conditions when selecting the right thickness for your engineered hardwood floor
Q - Do installing Engineered Hardwood Floors increase my property value
Yes, installing engineered hardwood floors can increase your property value. Engineered hardwood is considered a high-quality, desirable flooring option due to its aesthetic appeal, durability, and practical benefits, all of which add value to a home. Here’s how engineered hardwood floors can impact property value:
1. Aesthetic Appeal and Buyer Desirability
- Look and Feel of Real Wood: Engineered hardwood has a top layer of real wood, providing the authentic look and feel of solid hardwood. This natural appearance is attractive to buyers who prefer the warmth, texture, and beauty of wood over synthetic materials.
- Timeless and Versatile: Wood floors are timeless and versatile, fitting well with various interior styles, from modern to traditional. Buyers view wood floors as a premium feature that can enhance a home’s overall appeal.
2. Durability and Low Maintenance
- Long-Lasting: Engineered hardwood is durable and can last 20-30 years or more with proper care. This longevity is a major selling point, as potential buyers are more likely to invest in a home with a durable, low-maintenance floor that won’t need replacement soon.
- Scratch and Moisture Resistance: Compared to solid wood, engineered hardwood is more resistant to humidity and temperature changes, reducing the likelihood of warping or expanding in various climates. This moisture resistance adds value in regions with higher humidity or seasonal changes.
3. Wide Range of Applications
- Versatile Installation Options: Engineered hardwood can be installed in areas where solid hardwood isn’t recommended, such as kitchens, basements, and homes with radiant heating. This versatility makes it a desirable option for buyers looking for wood flooring throughout the home.
- Compatibility with Various Subfloors: Unlike solid wood, engineered hardwood can be installed over concrete and other subfloors, expanding its applicability across different parts of the home and making it accessible in more properties.
4. Refinishing Potential
- Added Longevity with Refinishing: Higher-quality engineered hardwood floors with a thick top veneer layer can be refinished once or twice, which allows buyers to refresh the floors over time. This refinishing potential contributes to long-term value and is attractive to buyers.
5. Environmental Benefits
- Eco-Friendly Option: Engineered hardwood typically uses less hardwood overall compared to solid wood, making it a more sustainable choice. Buyers who value environmentally friendly building materials may find engineered wood appealing, adding to the property’s value in eco-conscious markets.
6. Increased Marketability
- Positive Impact on Sale Price: Homes with hardwood or engineered wood flooring tend to sell for more than homes with carpet or lower-quality flooring types. According to real estate studies, hardwood flooring can yield a higher return on investment, with many buyers willing to pay more for homes with quality wood floors.
- Faster Sale Time: Homes with engineered wood floors may also sell faster, as buyers often see hardwood as a desirable upgrade that reduces the need for immediate renovation.
7. Perceived Luxury and Quality
- High-End Look: Engineered hardwood flooring is often associated with luxury and quality, and it’s a popular choice for modern, high-end properties. By installing engineered wood, you create an upscale feel that appeals to a broad range of buyers, especially those seeking a premium look without the cost of solid wood.
Summary of Value-Adding Factors
- Aesthetic Appeal: Adds timeless beauty and versatility to any home.
- Durability and Longevity: Long-lasting, low-maintenance, and resistant to moisture and temperature changes.
- Refinishing Potential: Increases longevity and maintains value over time.
- Marketability: Homes with hardwood floors can sell for more and often sell faster.
- Eco-Friendly: Appeals to buyers who prioritize sustainable materials.
Overall, engineered hardwood floors can significantly enhance your property’s value, making your home more attractive to buyers and providing a solid return on investment.
Q - Is Engineered Hardwood flooring considered to be Hypoallergenic
Yes, engineered hardwood flooring is generally considered a hypoallergenic flooring option, making it a suitable choice for people with allergies or respiratory sensitivities. Here’s why it’s a good option for maintaining a cleaner and healthier indoor environment:
1. Non-Allergenic Surface
- Easy to Clean: Engineered hardwood has a smooth, hard surface that doesn’t trap allergens like dust, pollen, pet dander, or mold spores. Regular sweeping or vacuuming can easily remove these particles, helping to keep indoor air quality cleaner.
- Minimal Dust and Particle Buildup: Unlike carpet or certain types of soft flooring, engineered hardwood does not harbor allergens, which can reduce overall dust and allergen buildup in the home.
2. Resistant to Mold and Mildew
- Moisture Resistance: Engineered hardwood is more moisture-resistant than solid hardwood due to its multi-layered construction. This feature helps prevent the growth of mold and mildew, which are common allergens, especially in humid areas.
- Suitable for Humid Areas: Engineered wood can be installed in rooms like kitchens and basements with moderate humidity levels (with proper underlayment and moisture barriers), making it a good option in homes where humidity might be a concern.
3. Does Not Off-Gas Harmful Chemicals
- Low-VOC Finishes Available: Many manufacturers offer engineered wood flooring with low-VOC (volatile organic compound) finishes and adhesives, reducing the potential for off-gassing that can cause respiratory issues. When purchasing, look for certifications like GREENGUARD or FloorScore, which indicate low VOC emissions.
- No Synthetic Fibers: Unlike some synthetic carpets or vinyl floors, engineered hardwood doesn’t contain fibers or materials that might attract and hold allergens or dust mites.
4. Hypoallergenic Installation Options
- Floating Installations: With a floating floor installation (click-lock method), no adhesives are required, further reducing exposure to potential allergens. This installation method is ideal for those who are highly sensitive to chemicals and allergens.
- Glue-Down with Low-VOC Adhesives: If you choose a glue-down installation, select low-VOC adhesives to ensure minimal chemical emissions in the indoor environment.
5. Durable and Long-Lasting
- Easy Maintenance Over Time: Engineered hardwood is highly durable, requiring only routine cleaning to maintain a hypoallergenic environment. This is ideal for those with allergies, as other flooring types may degrade or trap allergens more easily over time.
Best Practices for Keeping Engineered Hardwood Hypoallergenic
- Clean Regularly: Regular sweeping, vacuuming (with a hardwood-safe attachment), and damp mopping can help keep allergens off the floor.
- Maintain Indoor Humidity: Keep indoor humidity levels between 30-50% to prevent moisture buildup, which can help avoid mold growth.
- Use Hypoallergenic Finishes and Adhesives: If refinishing or installing, choose low-VOC finishes and adhesives to maintain indoor air quality.
Summary
Engineered hardwood is hypoallergenic due to its non-porous, easy-to-clean surface, moisture resistance, and the availability of low-VOC finishes. By keeping allergens at bay, engineered hardwood is a great choice for allergy sufferers and those looking to create a cleaner, healthier home environment.
Q - Is Engineered Hardwood Flooring Environmentally Friendly
Yes, engineered hardwood flooring is considered more environmentally friendly than solid hardwood in several ways. Its structure, manufacturing process, and the sustainable practices associated with many engineered wood products contribute to its eco-friendliness. Here’s a breakdown of the factors that make engineered hardwood flooring a more sustainable choice:
1. Efficient Use of Hardwood Resources
- Thinner Hardwood Veneer: Engineered hardwood uses only a thin layer of real hardwood as the top veneer, meaning less hardwood is required per plank compared to solid wood flooring. This reduces the demand for slow-growing hardwood trees.
- Core Layers from Sustainable Materials: The core layers of engineered wood are typically made from fast-growing, sustainable materials like plywood or high-density fiberboard (HDF). This efficient use of materials allows manufacturers to maximize wood resources.
2. Sustainable Sourcing and Certifications
- Forest Stewardship Council (FSC) Certification: Many engineered wood products carry FSC certification, meaning the wood has been sourced from responsibly managed forests that meet stringent environmental, social, and economic standards.
- Sustainable Forest Management: By requiring less hardwood, engineered wood supports sustainable forest management practices, allowing forests more time to regenerate and reducing the environmental impact of logging.
3. Lower Carbon Footprint in Production
- Efficient Manufacturing: The manufacturing process for engineered wood requires less raw material and often produces less waste than solid hardwood production.
- Reduced Shipping Emissions: Engineered wood is lighter than solid hardwood, making it easier and less costly to transport, which can lower carbon emissions associated with shipping.
4. Improved Stability and Longer Lifespan
- Moisture Resistance and Durability: Engineered wood’s layered construction gives it better stability and moisture resistance than solid wood, which helps extend its lifespan and reduces the frequency of replacement. A longer lifespan translates to fewer materials and less energy used in replacement flooring.
- Refinishing Potential: Higher-quality engineered wood with a thicker veneer can be refinished one or two times, extending its life and reducing waste.
5. Low VOC Options and Health Benefits
- Low VOC Emissions: Many engineered wood products are available in low-VOC (volatile organic compound) options, contributing to better indoor air quality. Certifications like GREENGUARD and FloorScore indicate that the flooring emits low levels of VOCs, making it a healthier choice for indoor environments.
- Eco-Friendly Adhesives: Many engineered wood floors use water-based or low-VOC adhesives, reducing the environmental impact and chemical emissions.
6. Waste Reduction and Recyclability
- Efficient Use of Byproducts: During production, byproducts from engineered wood manufacturing (like wood chips and sawdust) are often repurposed, reducing waste.
- Recyclability: While engineered wood is not as recyclable as natural hardwood, some components can be recycled. It can also be repurposed or upcycled if it’s removed carefully, which contributes to reducing landfill waste.
7. Compatible with Radiant Heating Systems
- Energy Efficiency: Engineered wood is often compatible with radiant heating systems, which are more energy-efficient than traditional heating methods. This compatibility can lower a home’s energy consumption over time, especially in colder climates.
Summary of Eco-Friendly Benefits
- Reduced hardwood usage due to the thin veneer layer.
- Sustainable sourcing through certifications like FSC.
- Lower carbon footprint from efficient manufacturing and lighter transport.
- Longer lifespan and refinishing potential reduce waste.
- Low VOC emissions improve indoor air quality.
- Recyclability and waste reduction through responsible production.
Engineered hardwood is a more sustainable alternative to solid hardwood, balancing the natural beauty of wood with eco-friendly benefits. When sourced responsibly and maintained well, it’s a flooring choice that aligns well with environmental sustainability.
Q - Do I need to replace existing skirting when installing Engineered Hardwood Flooring
When installing engineered hardwood flooring, replacing existing skirting boards is optional but can provide a cleaner, more finished look. Here are some options to consider and the factors that may influence your choice:
1. Leaving Existing Skirting in Place
- How It Works: If you prefer to keep the existing skirting, you can install the engineered hardwood with an expansion gap along the edges and then cover this gap with scotia trim or quarter-round molding. The trim will sit along the bottom of the skirting, hiding the expansion gap.
- Benefits:
- Saves time and money since you don’t need to remove or replace skirting boards.
- Avoids potential wall damage from removing the existing skirting.
- Considerations:
- Adding trim around the skirting may make the room look slightly smaller.
- It adds an additional layer, which some people may find less aesthetically pleasing.
2. Removing and Reinstalling Skirting Boards
- How It Works: Another option is to remove the existing skirting before installing the engineered hardwood and then reinstall it after the floor is in place. This way, the flooring can be laid with an expansion gap underneath the skirting, avoiding the need for additional trim.
- Benefits:
- Provides a seamless, professional finish without extra trim or molding.
- Maintains a clean, modern look, as the skirting sits directly on the floor.
- Considerations:
- Requires careful removal to avoid damaging the skirting or walls.
- Slightly more labor-intensive and may require repainting or touch-ups when reinstalling.
3. Replacing the Skirting Boards
- How It Works: If you’re looking for a fresh look or the existing skirting is outdated or damaged, you can replace it entirely. Install the engineered hardwood with an expansion gap, and then fit new skirting boards directly on top of the flooring.
- Benefits:
- Gives the room a completely updated, cohesive look, especially if you choose skirting that complements the new flooring.
- Allows you to adjust the height or style of the skirting to suit the new floor.
- Considerations:
- Increases the overall cost of the project, as it involves purchasing and fitting new skirting.
- Adds more labor, but it can be worth it for a more modern or updated aesthetic.
Summary of Options
- Keep existing skirting: Quick and cost-effective but requires additional trim.
- Remove and reinstall skirting: Provides a clean look but requires careful handling and may involve some touch-up work.
- Replace skirting: Ideal for a fresh update but adds cost and labor to the project.
The choice depends on your budget, aesthetic preferences, and the condition of your current skirting boards. Replacing or reinstalling skirting generally provides a cleaner, more seamless finish, but if cost and time are concerns, adding trim around existing skirting is a practical solution.
Q - Where to use Quarter Rounds on a Engineered Hardwood floor installation
Quarter rounds are commonly used in engineered hardwood floor installations to cover the expansion gap around the perimeter of the room. They provide a clean and finished look by hiding the space between the floor and the wall or existing skirting. Here’s where and how quarter rounds are typically used:
1. Around the Room’s Perimeter
- Purpose: Engineered hardwood floors require an expansion gap (typically 6-12 mm) around the edges of the room to allow for natural movement due to temperature and humidity changes. Quarter rounds are installed along the perimeter to cover this gap, providing a seamless transition from the floor to the wall.
- Installation: The quarter round is attached to the skirting (not the floor), allowing the floor to expand and contract freely without restriction. It sits at the edge where the floor meets the wall, adding a finished look.
2. Against Skirtings When Skirting is Not Removed
- Purpose: If you’re leaving the existing skirtings in place, quarter rounds can be used to bridge the small gap between the flooring and the skirting. This avoids the need to remove and reinstall or replace the existing skirting.
- Installation: Place the quarter round along the base of the skirting, covering the expansion gap. This method is cost-effective and helps preserve the existing trim while still creating a polished look.
3. Around Door Frames and Cabinets
- Purpose: In areas where the floor meets door frames, cabinets, or other fixed objects, quarter rounds can be used to cover the expansion gap. This is especially helpful in kitchens and hallways.
- Installation: Measure and cut the quarter round to fit snugly around these fixtures, covering any visible gaps and blending the edges of the floor with surrounding structures.
4. Around Columns or Fixed Objects in Open Spaces
- Purpose: For rooms with columns, fireplace surrounds, or other immovable fixtures, quarter rounds can be installed to cover the expansion gap and create a clean finish around these features.
- Installation: Cut the quarter round to match the shape and size of the fixture, installing it snugly around the object to conceal the gap.
5. Transitioning Between Different Floor Types
- Purpose: In some cases, quarter rounds are used as a finishing element when engineered hardwood meets a different type of flooring, such as tile or carpet, especially if there’s a slight height difference.
- Installation: Place the quarter round along the edge of the engineered hardwood where it meets the adjoining flooring. This works best when transitioning between floors with similar heights or where you have a trim strip or transition piece in place.
Summary of Uses for Quarter Rounds
- Perimeter of the room: Covers expansion gaps around walls.
- Against existing skirtings: Bridges the gap between the floor and skirting if skirting isn’t removed.
- Around door frames and cabinets: Hides gaps where flooring meets fixed objects.
- Around columns or immovable features: Provides a neat finish around structural features.
- Transitions between floor types: Conceals small gaps between engineered wood and other flooring types.
In all cases, quarter rounds are a great solution to ensure a polished, finished appearance while allowing the engineered wood floor the flexibility it needs to expand and contract naturally

Shop All Engineered Hardwood Flooring Product

Read more about Engineered Hardwood Flooring Construction and Info

Showing all 6 results
-

FINoak Pre-Finished Engineered Hardwood Flooring 14/3 – 190mm wide
R946.00 m2 -
FINoak Pre-finished Engineered Hardwood Flooring 15/4 190mm wide
R1,173.00 m2 -
FINoak Pre-Finished Engineered Hardwood Flooring 14/3 – 260mm wide
R1,311.00 m2 -
FINoak Unfinished Engineered Hardwood Flooring 15/4 – 190mm wide
R994.00 m2 -
FINoak Herringbone Unfinished Engineered Hardwood Flooring 14/3 – 125mm wide
R1,035.00 m2 -
FINoak Unfinished Engineered Hardwood Flooring 15/4 – 220mm wide
R1,077.00 m2


